
Car Photography Angles: The 12-Shot Sequence Every Dealer Listing Needs
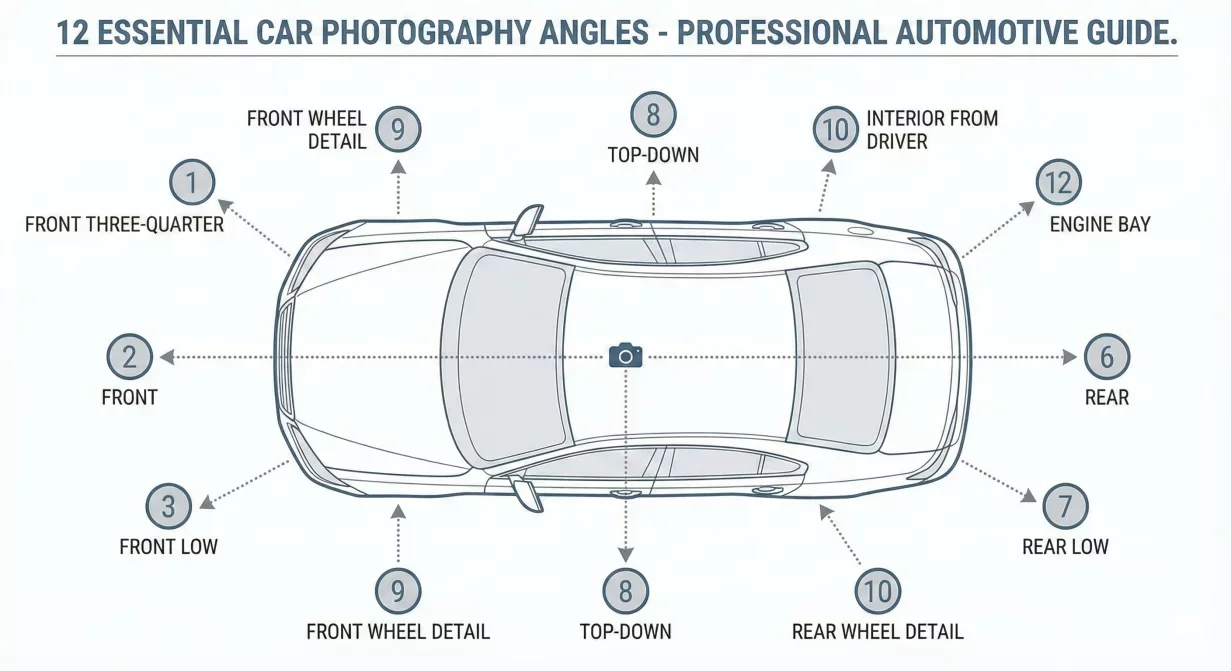
Car photography angles determine whether buyers see complete vehicle information or wonder what you are hiding. This 12-shot template provides the standard coverage every dealer listing needs, with specific guidance on each angle's purpose and capture technique.
Print this template and use it as your standard shot sequence. Consistent angle coverage across inventory produces professional presentation that builds buyer confidence.
The complete 12-shot sequence
The 12-shot sequence at a glance
- Hero three-quarter front
- Front direct
- Driver side profile
- Rear three-quarter
- Rear direct
- Passenger side profile
- Interior wide – dashboard view
- Front seats
- Rear seats
- Center console and infotainment
- Gauge cluster and mileage
- Trunk or cargo area
This sequence covers the vehicle comprehensively while maintaining efficient capture flow. Each angle serves a specific buyer need and slots into standard listing display conventions.
Shot 1: Hero three-quarter front
- Position: Front corner, typically driver's side, capturing hood, front fascia, and one side of the vehicle in a single frame.
- Purpose: This is your primary listing photo, the image that appears in search results and sets first impressions. It shows vehicle character more effectively than any other single angle.
- Technique: Stand at approximately forty-five degrees from the front corner, far enough back that the entire vehicle fits comfortably with buffer space. Keep the camera at headlight height, roughly three feet from ground. Ensure the vehicle appears centered and level.
- Common mistakes: Standing too close creates distorted proportions. Shooting from too high makes the vehicle appear small. Uneven horizon makes the car look tilted.
Shot 2: Front direct
- Position: Directly in front of the vehicle, centered on the grille.
- Purpose: Shows front fascia details, headlight design, and grille styling. Buyers use this angle to evaluate visual condition and identify specific trim packages.
- Technique: Stand centered on the vehicle, slightly above grille height. Include bumper, headlights, and hood edge. Leave space above and below the vehicle for cropping flexibility.
- Common mistakes: Off-center positioning makes the vehicle look asymmetrical. Standing too close cuts off bumper edges.
Shot 3: Driver side profile
- Position: Perpendicular to the driver's side, capturing the complete side view.
- Purpose: Shows vehicle proportions, body style, wheel design, and overall silhouette. Buyers use side profiles to assess style and identify body damage.
- Technique: Stand far enough back that the entire side fits in frame with buffer space. Keep camera at door handle height. Ensure wheels are visible completely, including tires meeting ground.
- Common mistakes: Clipping front or rear ends. Shooting from too high flattens the profile. Standing too close creates perspective distortion.
Shot 4: Rear three-quarter
- Position: Rear corner, typically the opposite side from the hero shot, showing rear and one side.
- Purpose: Complements the hero shot to show vehicle from multiple perspectives. Reveals rear styling, taillight design, and exhaust placement.
- Technique: Mirror the hero shot positioning but from the rear. Forty-five degree angle, full vehicle in frame, consistent height with hero shot.
- Common mistakes: Inconsistent angle or distance compared to hero shot creates visual discontinuity within the set.
Shot 5: Rear direct
- Position: Directly behind the vehicle, centered on the trunk or hatch.
- Purpose: Shows rear fascia, taillights, badging, and trunk design. Buyers verify model identification and assess rear-end condition.
- Technique: Stand centered, similar technique to front direct shot. Include bumper, lights, and rear window. Camera at taillight height.
- Common mistakes: Off-center positioning. License plate glare obscuring badging.
Shot 6: Passenger side profile
- Position: Perpendicular to the passenger side, mirroring the driver side shot.
- Purpose: Complete side coverage eliminates buyer questions about unseen damage. Shows passenger side door handles, trim, and any side-specific features.
- Technique: Match driver side shot positioning exactly. Same distance, height, and framing creates professional consistency.
- Common mistakes: Different distance or height than driver side creates mismatched pair.
Shot 7: Interior wide – dashboard view
- Position: From driver's door opening, showing dashboard, steering wheel, and front seats.
- Purpose: Provides overall interior impression including gauge cluster, infotainment screen, and dashboard materials. Buyers assess interior style and condition.
- Technique: Open driver's door fully. Stand outside the vehicle and angle camera to capture steering wheel, dashboard, center console, and both front seats. Include enough door frame to provide context.
- Common mistakes: Blown-out windows from exposure imbalance. Cutting off steering wheel or infotainment screen.
Shot 8: Front seats
- Position: From rear seat area or rear door opening, showing both front seats.
- Purpose: Shows seat condition, material type, and wear patterns. Buyers evaluate comfort features and assess upholstery condition.
- Technique: Capture both front seats including headrests and visible upholstery. Show seat adjustments and any visible wear.
- Common mistakes: Focusing only on driver seat. Missing headrests from frame.
Shot 9: Rear seats
- Position: From front seat area, showing rear seat and passenger space.
- Purpose: Shows rear passenger accommodation, seat condition, and available space. Important for family buyers and those who transport passengers frequently.
- Technique: Capture rear seat completely, including floor space. Show headroom context by including roof edge. For two-door vehicles, show access path to rear seats.
- Common mistakes: Dark, underexposed rear areas. Cutting off outboard seat positions.
Shot 10: Center console and infotainment
- Position: Close view of center stack, infotainment screen, and center console storage.
- Purpose: Shows technology features, screen size, and control layout. Buyers evaluate infotainment capabilities and storage options.
- Technique: Fill frame with center console area from shifter to climate controls. If screen can be powered on, show active display. Otherwise, capture screen cleanly without excessive reflection.
- Common mistakes: Screen glare obscuring display. Missing shifter or console storage from frame.
Shot 11: Gauge cluster and mileage
- Position: Close view of instrument cluster showing odometer reading.
- Purpose: Documents mileage for buyer verification. Shows gauge cluster design and any warning lights. Required by many marketplaces and builds buyer trust.
- Technique: Frame cluster to show odometer clearly readable. Include speedometer and other gauges for complete cluster view. Odometer must be in focus and legible.
- Common mistakes: Unreadable odometer from blur or angle. Reflection on cluster cover.
Shot 12: Trunk or cargo area
- Position: Standing at open trunk or hatch, showing cargo space.
- Purpose: Shows cargo capacity, floor covering, and available storage. Important for buyers with specific cargo needs.
- Technique: Open trunk fully. Capture entire cargo floor and walls. Show depth and width of space. For SUVs with folding seats, decide whether to show seats up or down based on primary buyer use case.
- Common mistakes: Dark cargo areas from poor lighting. Personal items or dealer materials left in space.
Adapting for vehicle types
This sequence requires minor adaptation for certain vehicle configurations.
- Pickup trucks: Replace trunk shot with bed photo. Add shot of bed from rear showing depth. Consider tailgate-down and tailgate-up options.
- Convertibles: Add top-down exterior shot if weather permits. Show top mechanism if relevant to buyer interest.
- Two-door vehicles: Rear seat access shot may differ. Show how passengers access rear seating.
- Commercial vehicles: Add cargo configuration shots as needed. Document specialized equipment or storage solutions.
Sequence efficiency tips
Capture in efficient order to minimize movement around the vehicle.
Start at hero position, move around exterior in consistent direction completing all exterior shots before opening any doors. Then stage interior and capture interior sequence. Finish with trunk or cargo.
This flow completes capture without backtracking and ensures all doors close properly between interior and exterior phases.
How Car Background AI processes your angles
Car Background AI batch processing handles complete 12-shot sequences as unified vehicle sets. Apply consistent background and enhancement treatment across all angles simultaneously. The platform's automotive-specific processing understands different requirements for exterior versus interior shots.
Final thoughts
These twelve car photography angles provide the comprehensive coverage buyers expect from professional dealer listings. Use this template consistently across every vehicle to eliminate missing-angle problems and build buyer confidence through complete visual information. Print the sequence, train your team, and make complete coverage automatic. Process your complete shot sequences through Car Background AI for consistent, professional results.
Frequently asked questions
Do I need all twelve shots for every vehicle?
Yes, for complete buyer confidence. Missing angles raise questions about what you might be hiding. Even if a particular view seems redundant, buyers expect comprehensive coverage from professional dealers. Complete sets build trust; incomplete sets undermine it.
What order should photos appear in listings?
Hero shot first, then exteriors, then interiors, with odometer and trunk near the end. This sequence matches buyer browsing patterns: overall impression first, then details. Most marketplace platforms allow reordering; arrange photos intentionally.
Should I take more than twelve photos?
Twelve provides essential coverage. Additional shots of special features, damage disclosure, or unique selling points add value when relevant. Avoid padding with redundant angles that waste buyer attention.
How do I handle vehicles with damage?
Document damage with additional photos beyond the standard twelve. Clear damage documentation builds trust by demonstrating transparency. Never omit standard angles hoping to hide problems; buyers will notice and trust erodes.
Can I modify this sequence for my dealership?
Yes, adapt for your specific needs while maintaining comprehensive coverage. Add angles for features your buyers care about. Remove nothing that provides essential vehicle information. Document your customized sequence and apply it consistently.
What if I cannot capture certain angles due to lot conditions?
Move the vehicle if possible. If not, capture what you can and note limitations. Incomplete coverage is sometimes unavoidable but should be exception rather than routine. Invest in solving capture obstacles that recur frequently.
75 E 3rd street, Sheridan, WY, 82801, USA
