
April 10, 2026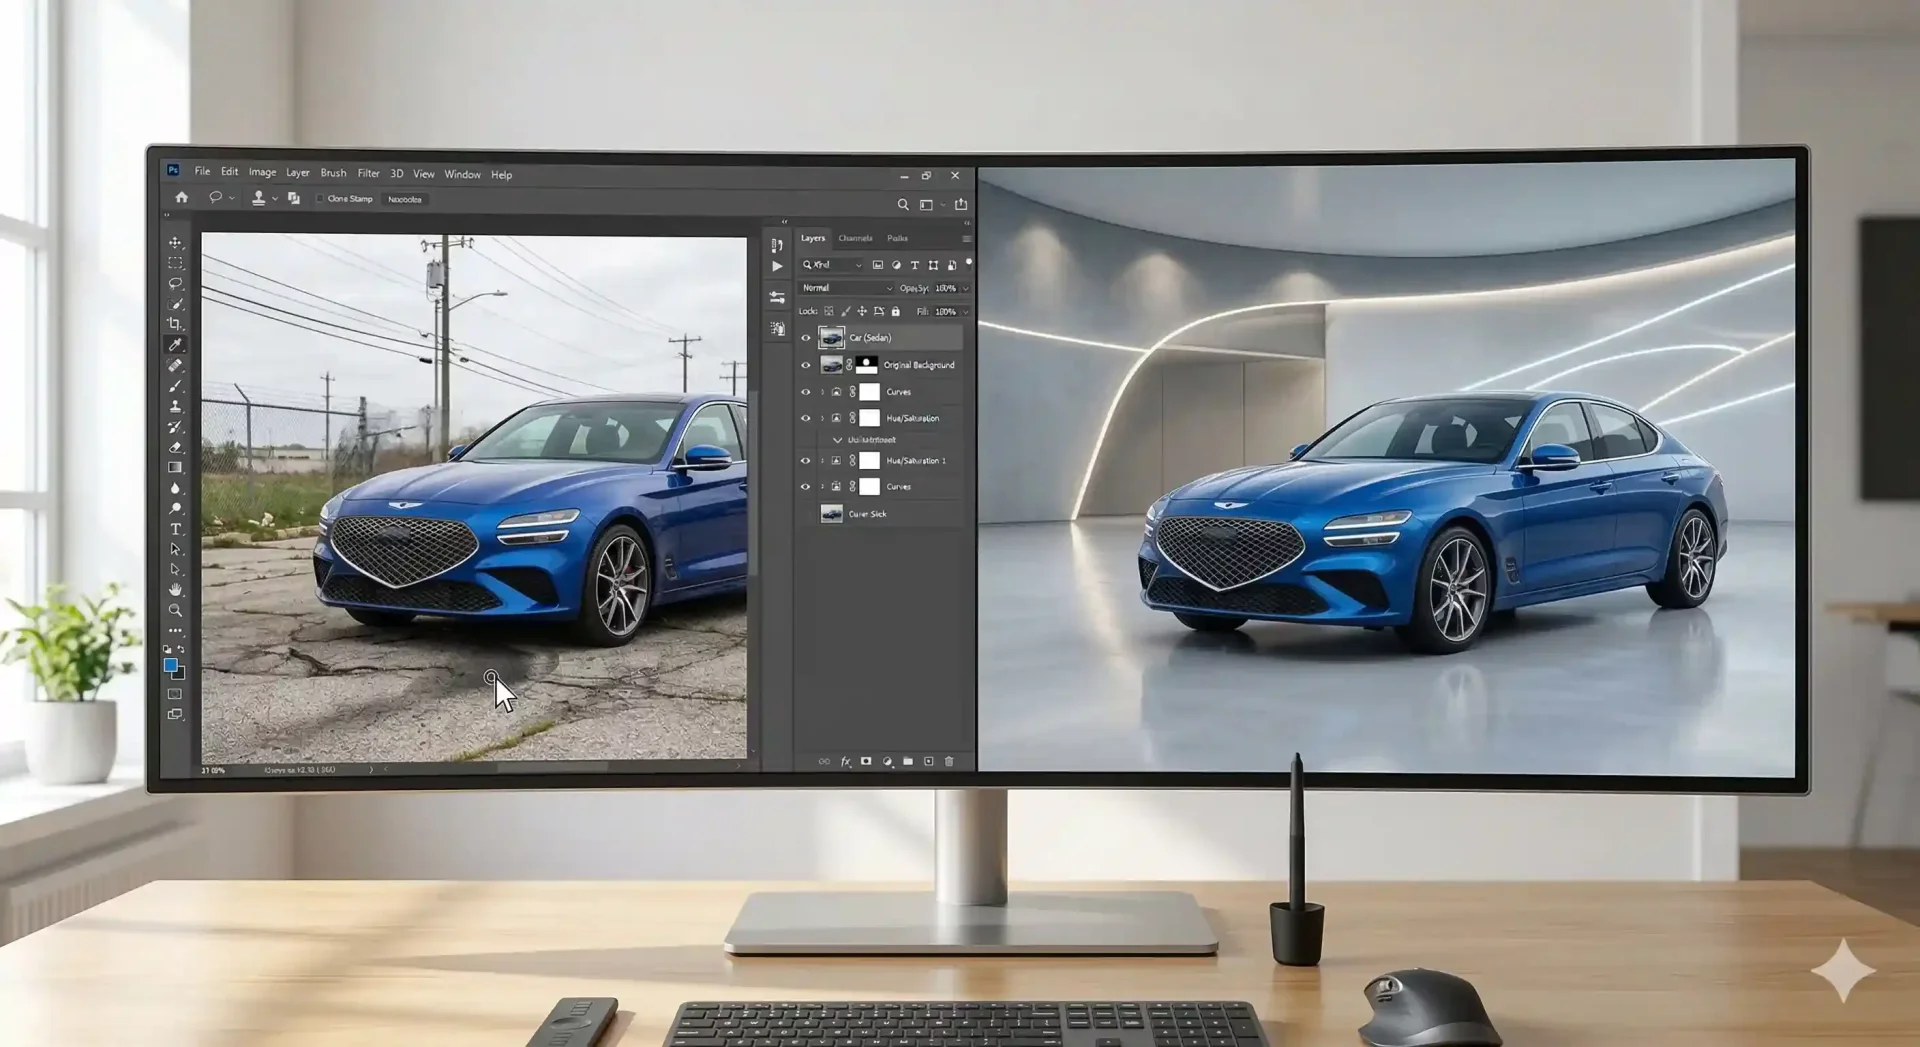
How to Change a Car Background in Photoshop Step by Step
A car background change is the single edit that transforms a cluttered lot photo into a listing image that looks like it came from a professional studio. Whether you use Photoshop or an AI tool, the goal is the same: remove the distracting environment and replace it with a clean, consistent backdrop that puts the vehicle front and center. The difference is how long it takes and whether the result scales across an entire inventory.
This guide walks through the full Photoshop process step by step – selection, masking, replacement, and shadow matching – so you understand exactly what the edit involves. It also shows where CarBG compresses that entire workflow into seconds, which matters when you are processing 20 vehicles a week rather than one.
Why a car background change matters for dealer listings
The background of a car photo communicates as much as the car itself. A vehicle shot in front of a chain-link fence next to an overflowing dumpster tells a different story than the same vehicle on a clean white showroom floor – even if the car is identical in both images. Buyers process this context subconsciously. The cluttered background signals "neglected lot." The clean background signals "professional dealership."
For dealers listing across multiple platforms (Cars.com, CarGurus, AutoTrader, Facebook Marketplace), background consistency across the inventory page is what creates the catalog effect. When every vehicle sits on the same backdrop, the page looks curated and intentional. When backgrounds vary from vehicle to vehicle, the page looks disorganized regardless of how good the individual cars are.
Tools needed for a car background change in Photoshop
Before starting the edit, make sure your Photoshop workspace is configured for vehicle work. You will need the following tools and panels accessible.
Selection tools. The Quick Selection Tool handles the initial rough selection. The Pen Tool provides precise control for complex edges like mirrors and antennas. Select and Mask (accessed via the Properties panel after making a selection) refines edges with feathering and contrast adjustments. For most car photos, you will use Quick Selection for the body panels and the Pen Tool for problem areas.
Layer management. Work with at least three layers: the original photo (locked as background), the masked vehicle on its own layer, and the replacement background below it. Add a fourth layer for the ground shadow. Naming your layers ("Vehicle," "New BG," "Shadow") prevents confusion when you return to the file later or hand it to another editor.
Your replacement background. Have your target backdrop ready before starting. A 4000 x 3000 pixel image at 72 to 300 DPI works for most listing purposes. Common choices: neutral gray studio, white showroom, outdoor scene with a blurred horizon. The background's lighting direction must roughly match the vehicle's lighting – if the car is lit from the left, the replacement scene should not have a hard shadow falling from the right.
Step-by-step process for changing a car background
Step 1: make the initial selection
Open your car photo and select the Quick Selection Tool (W). Brush over the vehicle body, working in broad strokes across the hood, roof, and side panels. Photoshop's edge detection will snap to the car's outline in most areas. Do not worry about perfection here – this is the rough pass. Hold Alt and brush to deselect any background areas that were accidentally included.
Step 2: refine the mask in Select and Mask
With your selection active, click "Select and Mask" in the options bar. Switch the view to "On Black" (shortcut: press A) to clearly see edge quality against a dark background. Use the Refine Edge Brush along the vehicle's outline, paying special attention to wheel spokes, mirror edges, antenna tips, and any area where the car and background meet at a complex angle. Adjust the Smooth slider to 2 to 4 to reduce jagged edges without losing detail. Set Feather to 0.5 to 1.0 px for a natural transition. Output to "New Layer with Layer Mask."
Step 3: clean up problem areas with the Pen Tool
Zoom to 200% and inspect the mask around mirrors, wheel wells, and window edges. Where the automatic refinement failed, switch to the Pen Tool (P) and manually trace the correct edge. Convert the path to a selection (Ctrl/Cmd + Enter), then add or subtract from the existing mask using a soft brush on the mask layer. This manual step is where most of the time goes – and where most editors encounter the problems described in our guide to fixing car background edits that look fake.
Step 4: place the replacement background
Drag your replacement background image into the file and position it below the masked vehicle layer. Scale and position the background so the horizon line sits at approximately the same height as the car's wheel contact point. If the background has a visible floor, align the floor plane with the bottom of the tires. A mismatch here – the car appearing to hover above or sink into the floor – is the most common giveaway that a car background change was done poorly.
Step 5: add a ground shadow
Create a new layer between the vehicle and the background. Using a large, soft black brush at 10 to 20% opacity, paint a shadow directly beneath the car, concentrated under the body and spreading outward slightly at the wheel contact points. Reduce the layer opacity to 30 to 50% until the shadow looks natural. The shadow should be darkest directly under the vehicle and fade gradually outward. Without this step, the car appears to float, which immediately signals a composite to anyone viewing the listing.
Matching lighting and shadows for realistic results
The most technically demanding part of a manual car background change is making the vehicle look like it naturally belongs in the new scene. Three elements must align.
Light direction. If the vehicle's highlight (the bright reflection on the hood or roof) comes from the upper left, the replacement background must have its light source in the same general direction. A scene lit from the right paired with a car lit from the left creates an impossible lighting situation that the viewer detects even without being able to articulate why it looks wrong.
Color temperature. A warm, golden-hour background paired with a car shot under cool, overcast light looks disconnected. Match the color temperature roughly by adjusting the vehicle's color balance (Image > Adjustments > Color Balance) or by selecting a background that matches the original shooting conditions.
Shadow consistency. The ground shadow you painted should match the ambient shadow density of the new background. A bright, evenly lit showroom background calls for a soft, subtle shadow. A dramatic outdoor scene with hard directional light calls for a defined, darker shadow with sharper edges.
Common Photoshop mistakes that make car background changes look fake
Five errors appear repeatedly in manual car background edits, and each one breaks the illusion of a natural photo.
Halo artifacts around the vehicle edge. A thin bright or dark line around the car where the original background was not fully removed. Fix by refining the mask edge and using "Decontaminate Colors" in Select and Mask.
Missing wheel spoke gaps. The mask fills in the spaces between spokes with solid color instead of showing the new background through them. Fix by manually masking each spoke gap with the Pen Tool.
Floating car (no ground shadow). The vehicle appears pasted onto the background with no contact with the ground plane. Fix by adding the shadow layer described in Step 5.
Mismatched perspective. The replacement background's vanishing point does not match the vehicle's angle. A car photographed at eye level placed on a background photographed from above looks immediately wrong. Fix by choosing backgrounds shot from a similar height and angle as the vehicle.
Over-sharpened edges. Applying too much sharpening after the composite creates an unnatural, cut-out look around the vehicle outline. Keep sharpening global and subtle (Unsharp Mask at 50 to 80%, radius 1.0).
Why manual Photoshop car background changes struggle at scale
The process above takes 15 to 30 minutes per image for a skilled editor. For a single hero shot or a marketing campaign, that investment is justified. For dealership inventory processing where every vehicle needs 12 to 15 edited images, the math becomes prohibitive.
Fifty vehicles at 12 images each equals 600 images. At 20 minutes per image, that is 200 hours of editing per month – five full-time weeks. Even outsourcing at $5 per image totals $3,000 monthly. And the output depends entirely on the editor's skill: one editor produces clean edges and matched shadows, another produces halos and floating cars.
This is the scaling problem that AI tools solve. CarBG processes a car background change in 2 to 5 seconds per image with consistent output quality across the entire batch. The detection, masking, replacement, shadow generation, and lighting match all happen automatically. The quality is purpose-built for automotive silhouettes, handling the wheel spokes, mirrors, and window transparency that trip up both manual editors and generic AI tools.
The practical approach for most dealerships: use Photoshop for the occasional custom marketing composite where creative control matters, and use AI for the daily inventory processing where speed and consistency matter. Both tools have a place – the question is which one fits the job.
Final thoughts
A car background change is the highest-impact single edit in automotive photography, whether done manually in Photoshop or automatically with AI. The Photoshop workflow gives you full creative control but demands significant time per image and consistent skill across your editing team. For inventory-scale processing, AI tools like CarBG with template-based backgrounds deliver the same visual outcome – a clean, professional listing image – at a fraction of the time and cost. Start with the right capture, choose your method based on volume, and the listings take care of themselves.
Frequently asked questions about car background changes
How long does a car background change take in Photoshop?
A clean car background change in Photoshop takes 15 to 30 minutes per image for a skilled editor. The time breaks down roughly as: 3 to 5 minutes for the initial selection, 5 to 10 minutes for edge refinement around mirrors, wheels, and windows, 2 to 3 minutes for background placement, and 3 to 5 minutes for shadow creation and lighting matching. Complex vehicles with roof racks, open doors, or unusual silhouettes can push the time to 45 minutes or more.
What is the best replacement background for dealer car photos?
The best replacement background is one that matches your dealership's brand and stays consistent across your entire inventory. Neutral options – light gray, white, or a clean showroom scene – work for most dealers because they are professional without being distracting. The specific choice matters less than using the same background for every vehicle. Consistency builds the catalog effect that buyers associate with trustworthy, well-run dealerships.
Can I change a car photo background on my phone?
Yes, though phone-based editing apps offer less precision than Photoshop for manual edits. For quick social media posts or personal listings, mobile apps can handle basic background removal and replacement. For dealership inventory at volume, AI tools accessed through a mobile browser provide professional-quality results without the limitations of phone-based editing apps. The key is that the AI processing happens server-side, so the phone is just the upload and download interface.
Why does my car background change look fake?
The most common reasons are: a visible halo around the vehicle edge where the old background was not fully removed, missing shadow beneath the car creating a floating effect, mismatched lighting direction between the vehicle and the new background, and filled-in wheel spoke gaps that should show the background behind them. Each of these is fixable with careful mask refinement and shadow work, but they require attention to detail that is hard to maintain across hundreds of images.
Is it worth learning Photoshop for car background editing?
Photoshop skills are valuable for custom marketing content where creative control matters – hero shots for your website, social media campaigns, or print advertising. For daily inventory processing, the time investment does not scale. A dealership listing 50 vehicles monthly would need 200+ hours of Photoshop editing time for full background replacement, which is impractical for most teams. AI tools handle the volume work while Photoshop serves the occasional creative project.
How do AI tools handle a car background change differently than Photoshop?
AI tools automate every step that a Photoshop editor performs manually: vehicle detection, edge masking, background removal, replacement compositing, shadow generation, and lighting matching. The entire sequence happens in 2 to 5 seconds per image. Car-specific AI tools like CarBG are trained on vehicle silhouettes, which means they handle wheel spokes, mirror edges, and window transparency by default rather than requiring manual correction for each one. The trade-off is that AI applies template-based results rather than custom creative direction.
Address
75 E 3rd street, Sheridan, WY, 82801, USA

Join our monthly email with car photography insights and tool updates
© 2026 CarBG LLC. All rights reserved.